Chery Kimo (2007 – 2015) – fuse and relay box diagram

Chery Kimo (2007 – 2015) – fuse and relay box diagram

Year of production: 2007, 2008, 2009, 2010, 2011, 2012, 2013, 2014, 2015

The instrument panel fuse panel

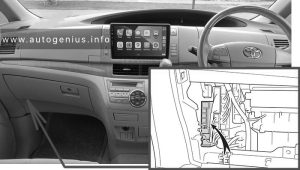
Fuse Box Location

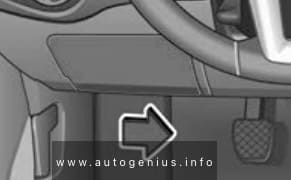
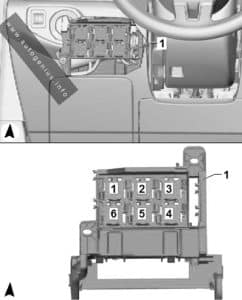
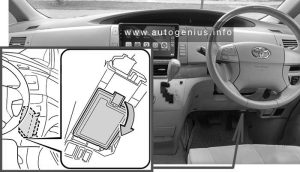
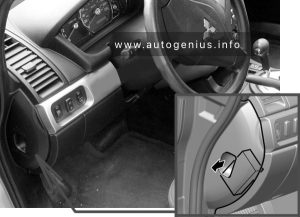
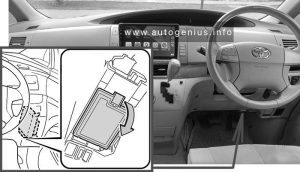
The instrument fuse box is located within the left cover plate of the dashboard.


Fuse Box Diagram

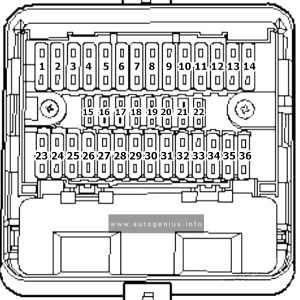
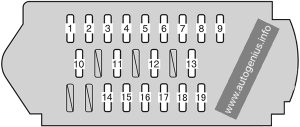
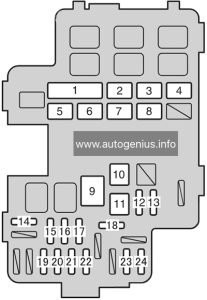
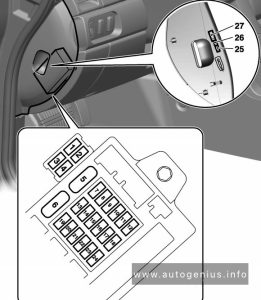
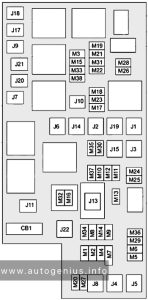
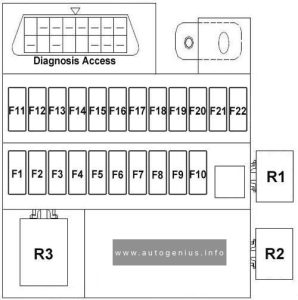
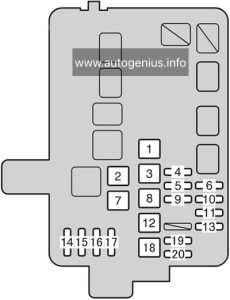
Chery Kimo - fuse and relay box diagram - instrument panel
Chery Kimo – fuse and relay box diagram – instrument panel


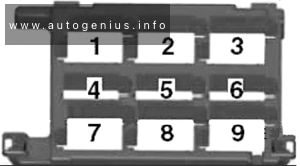
Assignment of the fuses in the instrument panel

No.
A
Function/component
F1 10 Combined instruments
F2 10 Rear view mirror, brake switch, BCM
F3 10 ABS control
F4 10 Air Bag
F5 Not used
F6 15 Washer, rear wiper power supply, sunroof control
F7 10 Steering power supply, A/C relay coil
F8 15 Front wiper
F9 15 Cigarette lighter
F10 10 Radio/player control
F11 Not used
F12 25 Start
F13 10 Diagnosis Access
F14 10 Braking Lamp
F15 20 Audio device
F16 15 Horn, fog lamp
F17 Not used
F18 10 Clearance lamp, ceiling lamp
F19 15 Alarm switch
F20 10 Lamp switch, instrument
F21 20 Sunroof power supply
F22 20 Rear defroster
Relay
R1 Blower Relay
R2 Steering relay
R3 Front wiper relay

Engine compartment fuse box

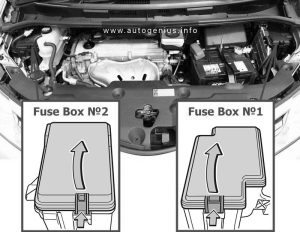
Fuse Box Location

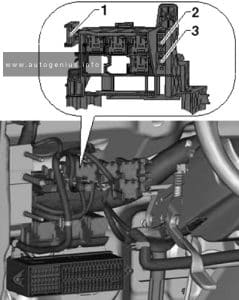
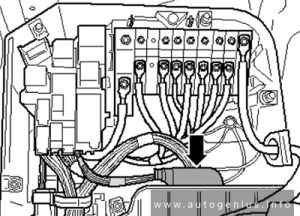
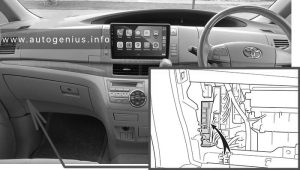
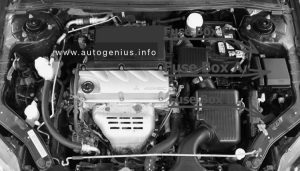
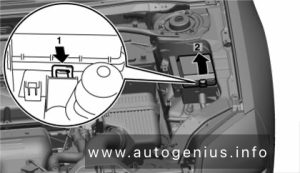
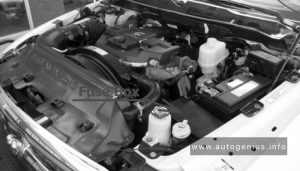
The fuse box is located near the front compartment battery.


Fuse Box Diagram

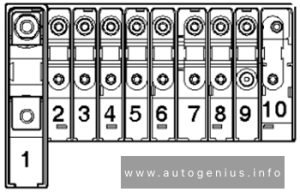
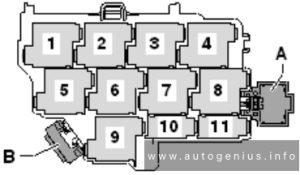
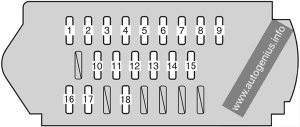
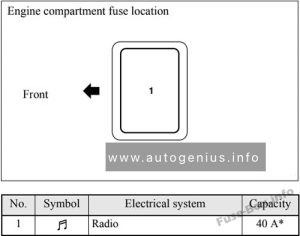
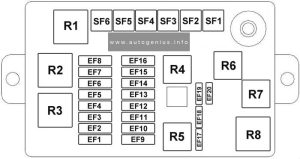
Chery Kimo - fuse and relay box diagram - engine compartment
Chery Kimo – fuse and relay box diagram – engine compartment


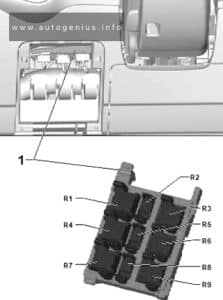
Assignment of the fuses in the engine compartment

No.
A
Function/component
SF1 30 Fan. high speed
SF2 30 BCM
SF3 30 A/C
SF4 40 Instrument electric
SF5 30 ABS
SF6 30 ABS
EF1 20 Fan. low speed
EF2 15 Front fog lamp
EF3 10 ECU
EF4 15 Fuel pump
EF5 30 Primary relay
EF6 10 Compressor
EF7 15 Oxygen sensor
EF8 Not used
EF9 15 Ignition coil
EF10 10 Backup lamp
EF11 10 Right position lamp
EF12 10 Left position lamp
EF13 10 Right high beam
EF14 10 Left high beam
EF15 10 Right low beam
EF16 10 Left low beam
EF17 10 Spare
EF18 10 Spare
EF19 10 Spare
EF20 10 Spare
Relay
R1 Front Fog Lamp Relay
R2 Fan High Speed Relay
R3 Fan Low Speed Relay
R4 Low Beam Relay
R5 Compressor
R6 High Beam Relay
R7 Main relay
R8 Electric Fuel Pump

WARNING: Terminal and harness assignments for individual connectors will vary depending on vehicle equipment level, model, and market.

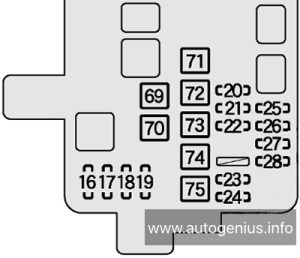
Toyota Previa (2009 – 2012) – fuse and relay box diagram

Toyota Previa (2009 – 2012) – fuse and relay box diagram

Year of production: 2009, 2010, 2011, 2011, 2012

The Toyota Previa is a versatile and spacious minivan, also known as an MPV (multi-purpose vehicle), that has been sold globally under different names. In some markets, like Australia, it was sold as the Toyota Tarago, while in others it retained the Previa name. It is renowned for its futuristic design, reliability, and practical features, making it a popular choice for families and commercial users alike.

Key Features of the Toyota Previa:

1.Unique Design: The Previa had a distinctive egg-shaped design, especially in its earlier generations, which made it stand out among other minivans. The rounded aerodynamic body contributed to better fuel efficiency and reduced drag.

2.Seating Capacity: Depending on the market and configuration, the Previa typically offered seating for 7 to 8 passengers, making it a spacious option for families.

3.Mid-Engine Layout: One of the most unique aspects of the first-generation Previa was its mid-engine design. The engine was located under the front seats, which allowed for better weight distribution but made maintenance slightly more challenging.

4.All-Wheel Drive (AWD): Some versions of the Previa were available with all-wheel drive, enhancing traction and making it suitable for a variety of driving conditions, including rough terrain or snow.

5.Sliding Doors: The Previa featured sliding rear doors for easier passenger entry and exit, especially in tight parking spaces.

6.Flexible Interior: With foldable or removable rear seats, the Previa was designed to offer flexible space for both passengers and cargo.

Generations:

1.First Generation (1990–1999):

•This model had a very unconventional design with a mid-engine layout. The engine was mounted underneath the front seats, and it featured rear-wheel drive or optional all-wheel drive.

•Engine options included a 2.4-liter inline-4 engine and later models offered supercharged variants for more power.

•The Previa was known for its durability and spacious interior, despite its somewhat unconventional engine placement.

2.Second Generation (2000–2006):

•The second-generation Previa featured a more traditional front-engine, front-wheel-drive layout.

•It was available with a range of engines, including more fuel-efficient options. In some markets, it came with a V6 engine.

•The design was more streamlined and modern, with improved safety features and more advanced technology in the interior.

•Toyota focused on comfort and refinement, making it more family-friendly.

3.Third Generation (2006–2019):

•This generation offered even more refinement in terms of luxury, technology, and performance.

•It came with advanced features like dual-zone climate control, premium audio systems, and even hybrid variants in some regions.

•By this generation, the Previa was primarily marketed in Asia, while markets like North America received the Toyota Sienna as the main minivan option.

Previa Hybrid:

In the later years, Toyota introduced a hybrid version of the Previa, particularly in the Asian markets. It featured Toyota’s Hybrid Synergy Drive, combining a gasoline engine with an electric motor to improve fuel efficiency, making it an eco-friendlier option for larger families.

Successors:

In many regions, the Toyota Previa was phased out or replaced by other models, such as the Toyota Alphard, Toyota Estima, or the Toyota Sienna (in North America). Despite this, the Previa remains a memorable model due to its distinctive design and practicality.

The Previa is still favored in the used car market for those looking for a reliable, spacious vehicle with Toyota’s legendary durability.


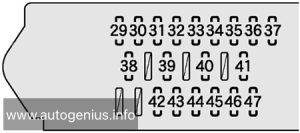
Instrument Panel Fuse Box №1 (left side)

Fuse Box Location

Remove the cover; Remove the lid.

Toyota Tarago (2009 - 2012) - fuse box location - passenger compartment fuse box no. 1
Toyota Previa (2009 – 2012) – fuse and relay box location – passenger compartment fuse box no. 1


Fuse Box Diagram

Toyota Previa (2009 - 2012) - fuse and relay box diagram - passenger compartment fuse box no. 1
Toyota Previa (2009 – 2012) – fuse and relay box diagram – passenger compartment fuse box no. 1


Assignment of the fuses in the Fuse Box №1

Name Amp Description
29 WELCAB 30A No circuit
30 4WD 7.5A No circuit
31 AC INV 15A No circuit
32 DR LOCK 30A Multiplex communication system
33 P/W FL 20A Power windows
34 S/R 20A Rear sunshade
35 PSD LH 30A Power slide door
36 P/W RL 20A Power windows
37 PBD 30A No circuit
38 RR WIP 15A Windshield wipers and washer, rear window wiper and washer, headlight cleaner
39 GAUGE №1 10A Anti-lock brake system, vehicle stability control system, adaptive front lighting system, electric cooling fan, Toyota parking assist system, headlight cleaner
40 PANEL 10A Instrument panel lights, Toyota parking assist system
41 TAIL 10A Front fog lights, tail lights, position lights, license plate lights
42 LH ECU-IG 10A Adaptive front lighting system, multiplex communication system, power rear seat, power slide door
43 SEAT HTR LH 10A Seat heater LH
44 GAUGE №2 10A Charging system, automatic transmission system, backup lights, Toyota parking assist system
45 STP RR 7.5A No circuit
46 STP HI MT 7.5A No circuit
47 STP RL 7.5A No circuit

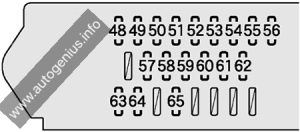
Instrument Panel Fuse Box №2 (right side)

Fuse Box Location

Remove the lid.

Toyota Tarago (2009 - 2012) - fuse box location - passenger compartment fuse box no. 2
Toyota Previa (2009 – 2012) – fuse and relay box location – passenger compartment fuse box no. 2


Fuse Box Diagram

Toyota Previa (2009 - 2012) - fuse and relay box diagram - passenger compartment fuse box no. 2
Toyota Previa (2009 – 2012) – fuse and relay box diagram – passenger compartment fuse box no. 2


Assignment of the fuses in the Fuse Box №2

Name Amp Description
48 PSB 30A No circuit
49 RR FOG 7.5A No circuit
50 P/W FR 20A Power windows
51 P/SEAT RH 30A Power seat
52 AM1 7.5A Starting system
53 STOP 15A Stop lights, high mounted stoplight, automatic transmission system, shift lock control system, multiport fuel injection system / sequential multi-port fuel injection system, anti-lock brake system, vehicle stability control system
54 OBD 7.5A On-board diagnosis system
55 PSD RH 30A Power slide door
56 P/W RR 20A Power windows
57 P/POINT 15A Power outlet
58 CIG 15A Cigarette lighter
59 RAD №2 7.5A Audio system, rear seat entertainment system
60 ECU-ACC 7.5A Power rear view mirrors, shift lock system
61 IGN 10A Multiport fuel injection system / sequential multiport fuel injection system, SRS airbag system, multiplex communication system
62 MET 7.5A Gauges and meters
63 FR WIP 30A Windshield wipers and washer
64 SEAT HTR RH 10A Seat heater RH
65 RH ECU-IG 10A Vehicle stability control system, air conditioning system, Toyota parking assist system, automatic transmission system, electric power steering system, power slide door, rear power sunshade, shift lock system, turn signal flashers, emergency flashers, vanity lights, multiplex communication system

Instrument Panel Fuse Box №3

Fuse Box Location

Remove the lid.

Toyota Tarago (2009 - 2012) - fuse box location - passenger compartment fuse box no. 3
Toyota Previa (2009 – 2012) – fuse and relay box location – passenger compartment fuse box no. 3


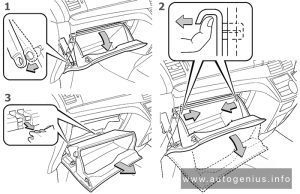
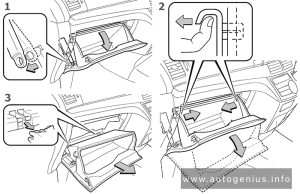
To access:

  1. Open the glove box. Slide off the damper.
  2. Pull both side of the glove box from the inside to disconnect the upper claws.
  3. Pull out the glove box and disconnect the lower claws.
Toyota Tarago (2009 - 2012) - fuse box location - passenger compartment fuse box no. 3
Toyota Previa (2009 – 2012) – fuse and relay box location – passenger compartment fuse box no. 3

Fuse Box Diagram

Toyota Previa (2009 - 2012) - fuse box diagram - passenger compartment fuse box no. 3
Toyota Previa (2009 – 2012) – fuse box diagram – passenger compartment fuse box no. 3


Assignment of the fuses in the Fuse Box №3

Name Amp Description
76 HTR 50A Air conditioning system
77 3RD SEAT RH 30A Power rear seat
78 3RD SEAT LH 30A Power rear seat
79 RR A/C 30A Air conditioning system

Engine Compartment

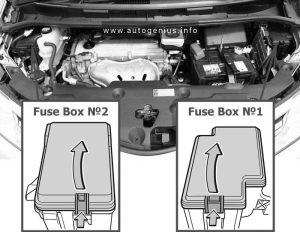
Fuse Box Location

Push the tab in and lift the lid off.

Toyota Tarago (2009 - 2012) - fuse box location - engine compartment
Toyota Previa (2009 – 2012) – fuse and relay box location – engine compartment


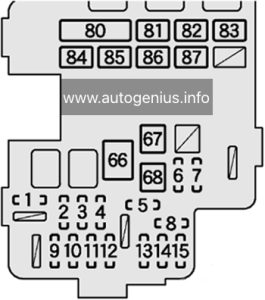
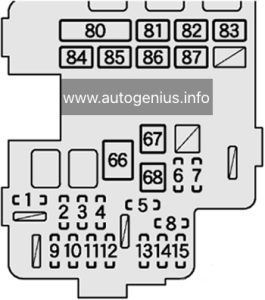
Fuse Box №1  Diagrams

Toyota Previa (2009 - 2012) - fuse and relay box diagram - engine compartment fuse box no. 1
Toyota Previa (2009 – 2012) – fuse and relay box diagram – engine compartment fuse box no. 1


Assignment of the fuses in the Engine Compartment Fuse Box №1

Name Amp Description
1 EFI 20A Multiport fuel injection system / sequential multiport fuel injection system
2 ECU-B 10A Gauges and meters, air conditioning system, power slide door, multiplex communication system, wireless remote control system
3 DOME 7.5A Interior lights, luggage room light, door courtesy lights, front personal lights, multiplex communication system
4 RAD №1 15A Audio system, rear seat entertainment system
5 MIR HTR 10A Outside rear view mirror
6 ABS №2 30A Anti-lock brake system, vehicle stability control system
7 DEF 25A Rear window defogger, “MIR HTR”
8 ST 5A No circuit
9 ETC-S 10A Multiport fuel injection system / sequential multiport fuel injection system
10 AM2 №2 7.5A Multiport fuel injection system / sequential multiport fuel injection system
11 TRN HAZ 15A Turn signal flashers, emergency flashers
12 IG2 15A Multiport fuel injection system / sequential multiport fuel injection system, starting system, “MET”, “IGN” fuse
13 AM2 №1 30A Starting system
14 FR DOOR 30A Multiplex communication system
15 A/F 30A Multiport fuel injection system / sequential multiport fuel injection system
66 EPS 80A Electric power steering system
67 ST 30A Multiport fuel injection system / sequential multiport fuel injection system
68 ABS №1 50A Anti-lock brake system, vehicle stability control system
80 RH R/B ALT 100A “CDS FAN”, “RDI FAN”, “PTC №1”, “PTC №2”, “PTC №3”, “H-LP CLAN”, “FOG” fuse
81 RH-MAIN-JB 60A “STOP”, “AM1”, “STP HI MT”, “STP RR”, “STP RL”, “OBD”, “P/W RR”, “PSB”, “P/W FR”, “RR FOG”, “P/SEAT RH”, “PSD RH”, “CIG”, “ECU-ACC”, “RAD №2”, “P/POINT”, “FR WIP”, “SEAT HTR RH”, “RH ECU-IG” fuse
82 LH-MAIN-JB 80A “TAIL”, “PANEL”, “P/W RL”, “PSD LH”, “S/R”, “4WD”, “PBD”, “P/W FL”, “DR LOCK”, “GAUGE №1”, “RR WIP”, “SEAT HTR LH”, “GAUGE №2”, “LH ECU-IG”, “WASH” fuse
83 SUB R/B 80A “HTR”, “RR A/C”, “3RD SEAT RH”, “3RD SEAT LH” fuse
84 F/B ALT 100A “ABS №1”, “ABS №2”, “DEF” fuse
85 ALT 140A Gauges and meters, charging system, “F/B ALT”, “SUB R/B”, “RH-MAIN-JB”, “LH-MAIN-JB”, “RH R/B ALT” fuse
86 F/B BATT 120A “EPS”, “ST”, “A/F”, “EFI”, “TRN HAZ”, “IG2”, “FR DOOR”, “ETC-S”, “AM2 №2”, “AM2 №1”, “DOME”, “ECU-B”, “RAD №1” fuse
87 RH R/B BATT 60A Headlight cleaner, “H-LP RL”, “H-LP LL”, “S/HORN”. “ECU-B3”, “ECU-B2”, “AMP”, “STRG LCK”, “HORN”, “H-LP RH”, “H-LP LH” fuse

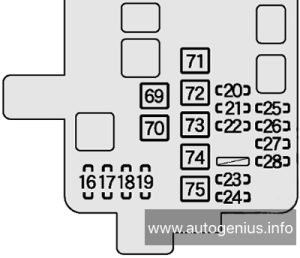
Engine Compartment Fuse Box №2

Fuse Box Diagrams

Toyota Previa (2009 - 2012) - fuse and relay box diagram - engine compartment fuse box no. 2
Toyota Previa (2009 – 2012) – fuse and relay box diagram – engine compartment fuse box no. 2


Assignment of the fuses in the Engine Compartment Fuse Box №2

Name Amp Description
16 H-LP LH 15A Left-hand headlight (high beam)
17 H-LP RH 15A Right-hand headlight (high beam)
18 H-LP LL 15A Left-hand headlight (low beam)
19 H-LP RL 15A Headlight beam level control system, right-hand headlight (low beam)
20 ECU-B3 7.5A No circuit
21 ECU-B2 7.5A Power windows
22 S/HORN 10A No circuit
23 DEICER 20A No circuit
24 FOG 20A Front fog lights
25 HORN 10A Horns
26 STRG LCK 20A No circuit
27 AMP2 30A No circuit
28 AMP1 30A No circuit
69 CDS FAN / RDI FAN №2 50A Electric cooling fan
70 RDI FAN / RDI FAN №1 50A Electric cooling fan
71 WEL CAB 30A No circuit
72 H-LP CLN 30A Headlight cleaner
73 PTC №3 50A Air conditioning system
74 PTC №2 50A Air conditioning system
75 PTC №1 50A Air conditioning system

WARNING: Terminal and harness assignments for individual connectors will vary depending on vehicle equipment level, model, and market.
Volkswagen Transporter  (T5.1; 2010 – 2015) – fuse box diagram

Volkswagen Transporter  (T5.1; 2010 – 2015) – fuse box diagram


Year of production: 2010, 2011, 2012, 2013, 2014, 2015

This article covers the post-facelift fifth-generation Volkswagen Transporter (T5.1), manufactured from 2009 to 2015. It provides fuse box diagrams for Volkswagen Transporter T5.1 models from 2010 to 2015, along with details on the location of the fuse panels within the vehicle and the specific functions of each fuse (fuse layout).

Passenger Compartment Fuse Boxes

Fuse Box Location

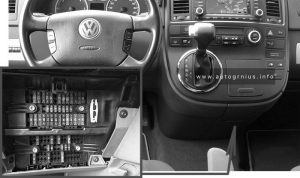
Volkswagen Transporter (T5.1; 2010 - 2015) - fuse box location - passenger compartment
Volkswagen Transporter (T5.1; 2010 – 2015) – fuse box location – passenger compartment

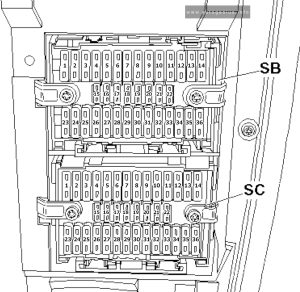
Fuse Box Diagram (-SB-, -SC-)

Volkswagen Transporter (T5.1; 2010 - 2015) - fuse box diagram - passenger compartment (holder B and holder C)
Volkswagen Transporter (T5.1; 2010 – 2015) – fuse box diagram – passenger compartment (holder B and holder C)

Assignment of the fuses in the instrument panel (fuse holders C and B)

Amps Function/component
Fuse holder B
SB1 30A Terminal 15 voltage supply relay
SB2 5A Steering angle sender
SB3 10A Onboard supply control unit
SB4 5A Lane change assist control unit
Lane change assist control unit 2
SB5 15A Front left headlight
SB6 15A Front left headlight
SB7 15A Onboard supply control unit
SB8 15A Rear lid control unit -J605-
SB8 20A Alarm horn
Onboard supply control unit
Left sliding door control unit
Rear lid control unit
Right sliding door control unit
SB9 30A Onboard supply control unit
SB10 10A Intermittent wiper switch
Rear wiper switch
Intermittent wiper regulator
Washer pump switch (automatic wash/wipe and headlight washer system)
SB11 5A Number plate light
SB12 5A/30A Light switch
SB13 10A Airbag control unit
Front passenger side airbag deactivated warning lamp
SB14 25A Headlight dipper/flasher switch
SB15 7,5A Fresh air blower switch
Rear fresh air blower switch
Fresh air blower isolation relay
SB16 5A Onboard supply control unit
SB17 5A Rear fog light cut-out contact switch
Control unit in dash panel insert
Rear left fog light bulb
SB18 5A Control unit in dash panel insert
SB19 5A Operating and display unit for camping equipment
Onboard supply control unit
10-pin connector (only models with electric interface, for external use)
SB20 5A Diagnostic connection
Differential lock control unit (2011-2015)
SB21 5A Starter motor relay
Engine control unit
10-pin connector (only models with electric interface, for external use)
SB22 7,5A Light switch
Control unit in dash panel insert
Trailer detector control unit
Diagnostic connection
SB23 5A only models with electric interface, for external use:
Starter inhibitor relay
Onboard supply control unit
Engine control unit
10-pin connector
SB23 30A Starter
Starter inhibitor relay
Engine control unit
SB23 30A Starter inhibitor relay
Starter inhibitor relay, clutch pedal switch
SB24 5A Steering angle sender
SB25 7,5A Fresh air blower switch
Front blower Bitron regulation sender
Climatronic control unit
Air conditioning system control unit
SB26 30A Light switch
SB27 15A Front right headlight
SB28 15A Front right headlight
Control unit in dash panel insert
SB29
SB30 10A Left washer jet heater element
Right washer jet heater element
Rear window wiper motor
Rear right wing door window wiper motor
Rear left wing door window wiper motor
SB31 30A Onboard supply control unit
SB32 30A Onboard supply control unit
SB33 30A Radio
Control unit with display for radio and navigation system
SB34 25A Fuse 14 on fuse holder D
Fuse 17 on fuse holder D
Fuse 20 on fuse holder D
Fuse 24 on fuse holder D
SB35 5A Connection (58s), in roof wiring harness
Connection 1 (58d), in main wiring harness
Connection 2 (58d), in main wiring harness
Connection 3 (58d), in main wiring harness
Connection (58b), in driver side door wiring harness
SB36 25A Onboard supply control unit -J519- (T73a/13)
Fuse holder C
SC1 15A 10-pin connector
SC2 5A Interior monitor send and receive module 1
Interior monitor send and receive module 2
SC3 10A Red Cross light switch
Red Cross light warning lamp
SC3 15A Taxi meter
Taxi alarm remote control, control unit
SC4 10A Rear differential lock switch
Rear differential lock vacuum switch
Differential lock control unit
Four-wheel drive control unit
SC5 10A 6-pin connector
SC6 5A Oil level and oil temperature sender
SC7 10A Rotating light switch
SC7 30A Alarm system control unit
SC8 5A Parking aid control unit
SC9 5A Cruise control system switch
SC10 10A Switches and instruments illumination regulator
Headlight range control, control unit
Left headlight range control motor
Right headlight range control motor
SC11 15A Taxi meter
Taxi alarm system 2 control unit
Alarm system relay 1
Taxi alarm remote control, control unit
Two-way radio
SC12 5A Front left headlight
SC12 30A Onboard supply control unit
SC13 5A Drive train CAN bus isolation relay
SC14 5A Front right headlight
SC14 30A Onboard supply control unit
SC15 5A Mobile telephone operating electronics control unit
Voice amplification control unit
SC16 7,5A Interface for external multimedia unit
TV tuner
SC17 7,5A Onboard supply control unit
Interior light and luggage compartment light
Interior monitor deactivation switch
Automatic anti-dazzle interior mirror
SC18 5A Rear fresh air blower switch
SC18 5A Operating and display unit for rear Climatronic
Rear blower regulation sender
SC19 5A Automatic anti-dazzle interior mirror
SC20 10A Onboard supply control unit
SC21 5A Rain sensor
SC22 10A High pressure sender
Air quality sensor
Air conditioning system relay
Coolant shut-off valve relay
SC23 7,5A/10A Operating and display unit for camping equipment
Roof display unit
Residual heat relay
Remote control receiver for auxiliary heating
Remote control receiver for auxiliary coolant heater
SC24 7,5A Interior light and luggage compartment light
SC25 25A Heated front seats control unit
SC26 10A Tachograph
SC27 30A Terminal 15 voltage supply relay 2
SC28 5A Mirror adjustment switch
Mirror adjustment change-over switch
SC29 20A Heater control unit
SC30 5A Operating and display unit for camping equipment
SC30 5A Auxiliary coolant heater relay
SC31 5A Onboard supply charger unit
SC31 25A Sliding sunroof adjustment control unit
SC32 20A Headlight washer system relay
SC33 5A Tachograph
SC34 5A Airbag coil connector and return spring with slip ring
Multifunction steering wheel control unit
SC35 20A Onboard supply control unit
SC36 5A Operating and display unit for camping equipment
10-pin connector (only models with electric interface, for external us)
10-pin connector (for optimal equipment police (UF4/UF5) only)

Fuse Holder F

Volkswagen Transporter (T5.1; 2010 - 2015) - fuse box diagram - passenger compartment (holder F)
Volkswagen Transporter (T5.1; 2010 – 2015) – fuse box diagram – passenger compartment (holder F)

Assignment of the fuses in the instrument panel (fuse holders F)

Amps Function/component
1 5A 10-pin connector (models with electric interface, for external use)
6-pin connector
2 3A 10-pin connector (models with electric interface, for external use)
3 15A 10-pin connector (models with electric interface, for external use)
Accident data memory
3 5A Accident data memory
4 15A 10-pin connector (models with electric interface, for external use)
5 5A 10-pin connector (models with electric interface, for external use)
6 25A 6-pin connector (models with electric interface, for external use)
7 15A 12V socket
7 30A Transformer with socket, 12V – 230V/115V (camper only, not for camper Beach)
8 20A Heater control unit
8 25A Auxiliary heater control unit
9 25A Rear fresh air blower switch
Fresh air blower isolation relay
9 30A Rear fresh air blower switch
Fresh air blower isolation relay
Rear fresh air blower
10 15A/30A Fresh air blower switch
Auxiliary heater relay
Air conditioning system control unit
Fresh air blower series resistor with overheating fuse
11 15A Cigarette lighter
12 5A 10-pin connector (models with electric interface, for external use)
6-pin connector
Accident data memory
13
14
15
16 30A Onboard supply charger unit (camper only, not for camper Beach)
17 30A Roof hydraulics control unit (camper only, not for camper Beach)
18 10A Camper only, not for camper Beach:
Map reading light bulb
Rear right reading light
Right interior light
Luggage compartment light on left
Kitchenette light 1
Kitchenette light 2
Kitchenette light 3
19 10A Camper only, not for camper Beach:
Refrigerator box
20 5A Camper only, not for camper Beach:
Water pump switch
Water pump
21 5A Camper only, not for camper Beach:
Operating and display unit for camping equipment
22 15A 12V socket 2
23 15A 12V socket 3
24 10A Switch-over relay 1 for roof ventilator
Switch-over relay 2 for roof ventilator
Switch for roof ventilator to ventilate load area
Switch for roof ventilator to extract air from load area
24 15A 12V socket 4
25 15A Trailer detector control unit
26 20A Trailer detector control unit
27 20A Trailer detector control unit
28 7,5A Reversing camera system control unit
29
30 5A 2020: Voice amplification control unit
31
32
33 15A Driver seat lumbar support adjustment switch
34 40A Right sliding door control unit
35 80A Battery isolation relay
Second battery charging circuit relay
36 40A Left sliding door control unit
37 40A Fresh air blower (models with second battery)
38 40A 6-pin connector (models with electric interface, for external use)
39
Equipment camper Beach only:
S131 10A Right interior light
Rear right interior light
Kitchenette light 1
Kitchenette light 3
S132 10A/15A 12V socket
S133 15A 12V socket 5
Rear left reading light
Kitchenette light 2


Coupling station on left of seat box (10-pin)
Volkswagen Transporter (T5.1; 2010 - 2015) - fuse box diagram - passenger compartment (coupling station on left seat box (10-pin))
Volkswagen Transporter (T5.1; 2010 – 2015) – fuse box diagram – passenger compartment (coupling station on left seat box (10-pin))
Amps Function/component
A
B
C
D 30A Amplifier


Fuses on relay carrier 1 (cockpit) 8-pin

Under dash panel (center, under the fuses).

Volkswagen Transporter (T5.1; 2010 - 2015) - fuse box diagram - passenger compartment - additional fuses (carrier 1 - cockpit - 8-pin)

Amps Function/component
6 15A Alarm system control unit (Taxi)
6 10A Taxi alarm system 2 control unit (Taxi)
A
B 30A Driver door control unit
Front passenger door control unit
C


Fuses on relay carrier 2 (cockpit) 8-pin

Under dash panel (center, under the fuses).

Volkswagen Transporter (T5.1; 2010 - 2015) - fuse box diagram - passenger compartment - additional fuses (carrier 2 - cockpit - 8-pin)
Volkswagen Transporter (T5.1; 2010 – 2015) – fuse box diagram – passenger compartment – additional fuses (carrier 2- cockpit – 8-pin)
Amps Function/component
A
B
C 40A Fresh air blower switch
Air conditioning system control unit
C 40A Fresh air blower switch
Air conditioning system control unit
Auxiliary coolant heater relay (models with auxiliary heating)
Fresh air blower


Engine Compartment Fuse Boxes

Fuse Box Location

Volkswagen Transporter (T5.1; 2010 - 2015) - fuse box location - engine compartment
Volkswagen Transporter (T5.1; 2010 – 2015) – fuse box location – engine compartment

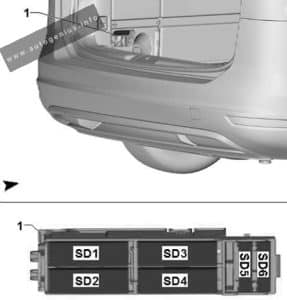
Fuse Box Diagram (-SD-)

Volkswagen Transporter (T5.1; 2010 - 2015) - fuse box diagram - engine compartment (holder D)
Volkswagen Transporter (T5.1; 2010 – 2015) – fuse box diagram – engine compartment (holder D)

Assignment of the fuses in the engine compartment (fuse holder D)

Amps Function/component
1 5A Radiator fan control unit
2 5A Additional coolant pump relay
Residual heat relay
Circulation pump
3 5A Heater element for crankcase breather
4 30A 2011-2015:
Voltage stabiliser (models with stop/start system)
Control unit with display for radio and navigation system (models with stop/start system)
Radio (models with stop/start system)
Fuse 18 on fuse holder B (models with stop/start system)
Fuse 15 on fuse holder C (models with stop/start system)
Fuse 16 on fuse holder C(models with stop/start system)
5 15A Mechatronic unit for dual clutch gearbox
Selector lever lock solenoid
Selector lever
6 30A ABS control unit
7 7,5A Washer pump
Windscreen and rear window washer pump
8
9 5A Engine control unit
10 5A Secondary air pump relay (for engine code AXA)
Activated charcoal filter system solenoid valve 1 (for engine code AXA)
10 15A Charge pressure control solenoid valve (for engine codes CAAA, CAAB, CAAC, CAAD, CAAE, CCHA, CCHB, CFCA)
Exhaust flap valve (for engine code CFCA)
Exhaust gas recirculation cooler change-over valve (for engine codes CAAA, CAAB, CAAC, CAAD, CAAE, CCHA, CCHB, CFCA)
10 10A Charge pressure control solenoid valve (for engine code CJKA)
Activated charcoal filter system solenoid valve 1 (for engine code CJKA)
Inlet camshaft control valve 1 (for engine code CJKA)
Turbocharger air recirculation valve (for engine code CJKA)
Intake manifold flap valve (for engine code CJKA)
11 30A Headlight dipper/flasher switch
Headlight main beam relay
12 10A Fuel pressure regulating valve (for engine codes CAAA, CAAB, CAAC, CAAD, CAAE, CCHA, CCHB, CFCA)
Fuel metering valve (for engine codes CAAA, CAAB, CAAC, CAAD, CAAE, CCHA, CCHB, CFCA)
13 10A 2010-2011: Left gas discharge light control unit
14 5A Fuel pump relay (for engine codes CAAA, CAAB, CAAC, CAAD, CAAE, CCHA, CCHB, AXA, CFCA)
Electric fuel pump 2 relay (for engine codes CAAA, CAAB, CAAC, CAAD, CAAE, CCHA, CCHB, CFCA)
15 10A Reversing light switch
16 5A Brake light switch
Air mass meter (for engine code AXA)
17 5A TCS and ESP button
Tyre pressure monitor display button
ABS control unit
18 5A Power steering control unit
19 5A Clutch pedal switch
Clutch position sender
Air mass meter (for engine codes CAAA, CAAB, CAAC, CAAD, CAAE, CCHA, CCHB, CFCA)
20 5A Engine control unit
Air mass meter (for engine code CJKA)
21 5A Exhaust gas recirculation valve (for engine code AXA)
22 10A Injector, cylinder 1~4 (for engine code AXA)
23 10A 2010-2011: Right gas discharge light control unit
24 5A Mechatronic unit for dual clutch gearbox
Selector lever
25 30A Engine control unit (for engine code AXA)
Ignition transformer (for engine code AXA)
25 20A Actuator 1~8 for camshaft adjustment (for engine code CJKA)
26 5A 2010-2011: Front left headlight
27 10A Continued coolant circulation pump (for engine codes CAAA, CAAB, CAAC, CAAD, CAAE, CCHA, CCHB, CFCA)
28 15A Treble tone horn (for models with taxi equipment)
29 5A 2010-2011: Front right headlight
30 20A Fuel pump relay (for engine codes CAAA, CAAB, CAAC, CAAD, CAAE, CCHA, CCHB, CFCA)
Fuel system pressurisation pump (for engine codes CAAA, CAAB, CAAC, CAAD, CAAE, CCHA, CCHB, CFCA)
Electric fuel pump 2 relay (for engine codes CAAA, CAAB, CAAC, CAAD, CAAE, CCHA, CCHB, CFCA)
Supplementary fuel pump (for engine codes CAAA, CAAB, CAAC, CAAD, CAAE, CCHA, CCHB, CFCA)
Fuel system pressurisation pump (for engine code AXA)
Fuel pump control unit (for engine code CJKA)
Fuel system pressurisation pump (for engine code CJKA)
31 15A Lambda probe heater
Lambda probe 1 heater after catalytic converter (for engine code AXA, CJKA)
32 5A Electric fuel pump 2 relay (for engine code AXA)
32 30A Engine control unit (for engine codes CAAA, CAAB, CAAC, CAAD, CAAE, CCHA, CCHB, CFCA)
32 30A Engine control unit (for engine code CJKA)
Ignition coil 1~4 with output stage (for engine code CJKA)
33 5A Automatic glow period control unit (for engine codes CAAA, CAAB, CAAC, CAAD, CAAE, CCHA, CCHB, CFCA)
Fuel shut-off valve switch-off relay (for engine code CJKA)
Additional coolant pump relay
Coolant pump relay (for engine code CJKA)
Continued coolant circulation pump (for engine code CJKA)
34 5A Onboard supply control unit
35 15A Fuel shut-off valve switch-off relay (for engine code CJKA)
Fuel pressure regulating valve (for engine code CJKA)
35 5A Battery monitor control unit (models with stop/start system)
36 30A Starter (models without stop/start system)
Starter inhibitor relay (models without stop/start system)
36 5A Data bus diagnostic interface (models with stop/start system)


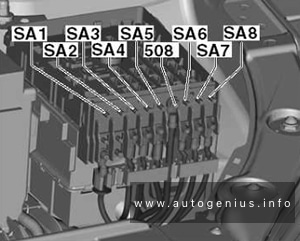
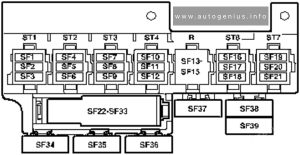
High power fuses (-SA-)

Volkswagen Transporter (T5.1; 2010 - 2015) - fuse box diagram - engine compartment (High power fuses (-SA-))
Volkswagen Transporter (T5.1; 2010 – 2015) – fuse box diagram – engine compartment (High power fuses (-SA-))
Volkswagen Transporter (T5.1; 2010 - 2015) - fuse box diagram - engine compartment (High power fuses (-SA-))
Volkswagen Transporter (T5.1; 2010 – 2015) – fuse box diagram – engine compartment (High power fuses (-SA-))


Amps Function/component
1 175A/225A Alternator
2 125A X-contact relief relay
Positive connection 2 (30), in main wiring harness
Positive connection 5 (30), in main wiring harness
Positive connection 6 (30), in main wiring harness
Positive connection 7 (30), in main wiring harness
Positive connection 8 (30), in main wiring harness
Positive connection 9 (30), in main wiring harness
Fuse 9 on fuse holder B
Fuse 14 on fuse holder B
3 50A/100A Second battery charging circuit relay
Positive connection 14 (30), in main wiring harness
Positive connection 15 (30), in main wiring harness
4 70A Positive connection (30), in engine compartment wiring harness
5 50A ABS control unit fuse 1
Fuse 6 on fuse holder D
6 50A/60A Automatic glow period control unit
Secondary air pump relay
7 100A Radiator fan control unit
8 40A/50A/100A Positive connection 1 (30), in interior wiring harness
Positive connection 2 (30), in interior wiring harness
Fuse 9 on fuse holder F
Fuse 14 on fuse holder F
Fuse 22 on fuse holder F
Fuse 23 on fuse holder F
Fuse 24 on fuse holder F
9 100A Positive connection (30), in main wiring harness
Positive connection 3 (30), in main wiring harness


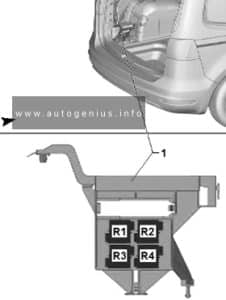
Relay carrier electronics box (8-pin)
Volkswagen Transporter (T5.1; 2010 - 2015) - fuse box diagram - engine compartment - Relay carrier electronics box (8-pin)
Volkswagen Transporter (T5.1; 2010 – 2015) – fuse box diagram – engine compartment – Relay carrier electronics box (8-pin)
Amps Function/component
A
B 40A ABS control unit

WARNING: Terminal and harness assignments for individual connectors will vary depending on vehicle equipment level, model, and market.
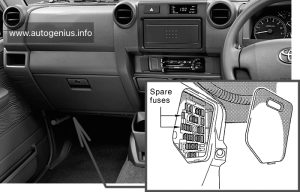
Toyota Land Cruiser 70 (AU 76/78/79; 2009 – 2014) – fuse and relay box diagram

Toyota Land Cruiser 70 (AU 76/78/79; 2009 – 2014) – fuse and relay box diagram

Year of production: 2009, 2010, 2011, 2012, 2013, 2014


This article provides fuse box diagrams for the Toyota Land Cruiser 76/78/79 (Australia) from the years 2009 to 2014. It also includes details on the location of the fuse panels inside the vehicle and explains the function and layout of each fuse.

Passenger Compartment Fuse Box

Fuse Box Location

Remove the lid to access.

Toyota Land Cruiser (AU 76/78/79; 2009 - 2014) - fuse box - location passenger compartment
Toyota Land Cruiser (AU 76/78/79; 2009 – 2014) – fuse and relay box – location passenger compartment


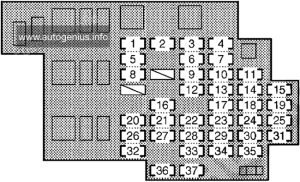
Fuse Box Diagrams

Fuse Box №1
Toyota Land Cruiser (AU 76/78/79; 2009 - 2014) - fuse box diagram - passenger compartment
Toyota Land Cruiser (AU 76/78/79; 2009 – 2014) – fuse and relay box diagram – passenger compartment


Assignment of the fuses under the instrument panel

Name Amp Description
1 DIFF 30A Differential lock system
2 DOOR 30A Power door lock system / wireless remote control system
3 POWER 30A Power windows
4 TRAILER 30A Trailer lights (tail lights), turn signal lights
5 ECU IG 15A 2009-2012: Electronically controlled fuel injection pump system, charging system, engine glow system, four-wheel drive control system, windshield wipers and washer, power antenna, differential lock system
2012-2014: Electronically controlled fuel injection pump system, charging system, engine glow system, four-wheel drive control system, windshield wipers and washer, power antenna, differential lock system, ABS, wireless remote control system
6 WIP 20A Windshield wipers and washer
7 CIG 15A Cigarette lighter
8 GAUGE 15A Back-up lights, air conditioning system, rear window defogger, electronically controlled fuel injection pump system, clock, emergency flashers
9 FUEL HTR 15A Fuel heater
10 ACC 7.5A Clock, audio system, power antenna
11 STOP 15A Electronically controlled fuel injection pump system, stop lights, high mounted stoplight
12 DC/DC 15A DC/DC converter
13 H/LP HI LH 10A No circuit
14 TRAILER STOP 15A Trailer lights (tail lights)
15 PANEL 10A Clock, audio system, emergency flashers, instrument panel light control, door lock system, rear window defogger, power antenna, gauges and meters, air conditioning system
16 DOME №1 10A 2009-2012: Gauges and meters, interior light
2012-2014: Gauges and meters, interior light, wireless remote control system
17 H/LP HI RH 10A Right-hand headlight (high beam), service reminder indicators and warning buzzers
18 OBD2 7.5A On-board diagnosis system
19 TAIL 10A Parking lights, tail lights, license plate lights, electronically controlled fuel injection pump system, trailer lights (tail lights)
20 FR FOG 15A Front fog lights, gauges and meters
21 ECU-B 10A Electronically controlled fuel injection pump system, clock, power antenna
22 INJ 10A Electronically controlled fuel injection pump system
23 H/LP LO LH 10A Left-hand headlight (low beam)
24 STOP 30A All components in “STOP” and “TRAILER STOP” fuses
25 DOME №2 10A Interior lights
26 RR FOG 15A No circuit
27 RADIO 15A Audio system
28 IGN 10A Electronically controlled fuel injection pump system, SRS airbag system
29 H/LP LO RH 10A Right-hand headlight (low beam)
30 DEFOG 20A Electronically controlled fuel injection pump system, rear window defogger
31 EFI №2 10A Electronically controlled fuel injection pump system
32 A/C 10A Air conditioning system
33 MET 10A Gauges and meters
34 ST 7.5A Electronically controlled fuel injection pump system, starting system, engine glow system
35 BLACK 7.5A No circuit
36 SPARE 10A Spare fuse
37 SPARE 20A Spare fuse


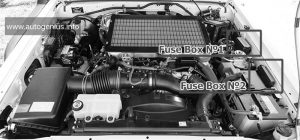
Engine Compartment Fuse Boxes

Fuse Box Location

Toyota Land Cruiser (AU 76/78/79; 2009 - 2014) - fuse box location - engine compartment
Toyota Land Cruiser (AU 76/78/79; 2009 – 2014) – fuse and relay box location – engine compartment


Fuse Box Diagrams

Fuse Box №1
Toyota Land Cruiser (AU 76/78/79; 2009 - 2014) - fuse box diagram - engine compartment fuse box no. 1
Toyota Land Cruiser (AU 76/78/79; 2009 – 2014) – fuse and relay box diagram – engine compartment fuse box no. 1


Assignment of the fuses in the Fuse Box №1

Name Amp Description
1 HTR 50A Air conditioning system
2 ALT 140A All components in “GLOW1”, “GLOW2”, “HEAD”, “MAIN1 ”, “MAIN2”, “AM2”, “HORN”, “EFI MAIN”, “EFI MAIN2”, “TURN&HAZ”, “ALT-S”, “H/LP LO RH”, “H/LP LO LH”, “TRAILER”, “H/LP HI RH”, “TAIL”, “PANEL”, “FR FOG”, “DOME”, “ECU-B”, “RADIO” and “DOOR” fuses
3 GLOW1 80A Engine glow system
4 GLOW2 80A Engine glow system
5 AM1 №2 50A 2009-2012: All components in “ECU IG”, “GAUGE” and “WIP” fuses
2012-2014: All components in “ECU IG”, “GAUGE” and “WIP” fuses, front fog lights, rear fog lights
6 AM1 30A Cigarette lighter, starting system, all components in “ST” and “ACC” fuses
7 AM1 №3 50A Cigarette lighter, all components in “ACC” fuse
8 ALT MAIN 50A Stop lights, air conditioning system, on-board diagnosis system, audio system
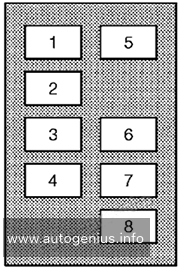
Fuse Box №2
Toyota Land Cruiser (AU 76/78/79; 2009 - 2014) - fuse box diagram - engine compartment fuse box no. 2
Toyota Land Cruiser (AU 76/78/79; 2009 – 2014) – fuse and relay box diagram – engine compartment fuse box no. 2


Assignment of the fuses in the Fuse Box №2

Name Amp Description
1 HEAD 50A Right-hand headlight (low beam), left-hand headlight (low beam), right-hand headlight (high beam), left-hand headlight (high beam)
2 MAIN2 50A 2009-2012: Audio system, all components in “ECU-B”, “DOME №1”, “DOME №2” and “DOOR” fuses
ABS MTR 50A 2012-2014: ABS
3 MAIN1 50A 2009-2012: Tail lights, front fog lights, rear fog lights, all components in “PANEL” fuse
2012-2014: Tail lights, all components in “PANEL” fuse, trailer, audio system, all components in “ECU-B”, “DOME №1” and “DOOR” fuses
4 AM2 50A All components in “MET”, “IGN” and “INJ” fuses
5 HORN 10A Horns
6 EFI MAIN 15A Electronically controlled fuel injection pump system
7 EFI MAIN2 15A Electronically controlled fuel injection pump system
8 TURN&HAZ 15A Turn signal lights, tail lights, service reminder indicators and warning buzzers, trailer lights (tail lights)
9 ABS SOL 30A 2012-2014: ABS
10 ALT-S 7.5A Charging system

WARNING: Terminal and harness assignments for individual connectors will vary depending on vehicle equipment level, model, and market.
Toyota Tarago (2013 – 2015) – fuse and relay box diagram

Toyota Tarago (2013 – 2015) – fuse and relay box diagram

Year of production: 2013, 2014, 2015

Instrument Panel Fuse Box №1 (left side)

Fuse Box Location

Remove the cover; Remove the lid.

Toyota Tarago (2013 - 2015) - fuse box location - passenger compartment fuse box no. 1
Toyota Tarago (2013 – 2015) – fuse and relay box location – passenger compartment fuse box no. 1


Fuse Box Diagram

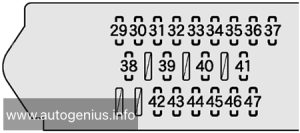
Toyota Tarago (2013 - 2015) - fuse box diagram - passenger compartment fuse box no. 1
Toyota Tarago (2013 – 2015) – fuse and relay box diagram – passenger compartment fuse box no. 1


Assignment of the fuses in the Fuse Box №1

Name Amp Description
1 WELCAB 30A No circuit
2 4WD 7.5A No circuit
3 AC INV 15A No circuit
4 DR LOCK 30A Smart entry & start system, pushbutton start system, multiplex communication system
5 P/W FL 20A Power windows
6 S/R 20A Rear sunshade
7 PSD LH 30A Power sliding doors
8 P/W RL 20A Power windows
9 PBD 30A No circuit
10 RR WIP 15A Windshield wipers and washer, rear window wiper and washer, headlight cleaners
11 GAUGE №1 10A Anti-lock brake system, vehicle stability control, adaptive frontlighting system, electric cooling fans, Toyota parking assist-sensor, headlight cleaners
12 PANEL 10A Instrument panel lights, Toyota parking assist-sensor
13 TAIL 10A Front fog lights, tail lights, front position lights, license plate lights
14 LH ECU-IG 10A Adaptive front-lighting system, multiplex communication system, smart entry & start system, pushbutton start system, power sliding doors, power seat (third seats)
15 SEAT HTR LH 10A Seat heater LH
16 GAUGE №2 10A Charging system, automatic transmission system / continuously variable transmission system, back-up lights, Toyota parking assist-sensor, power seat (third seats)
17 STP RR 7.5A No circuit
18 STP HI MT 7.5A No circuit
19 STP RL 7.5A No circuit

Instrument Panel Fuse Box №2 (right side)

Fuse Box Location

Remove the lid.

Toyota Tarago (2013 - 2015) - fuse box location - passenger compartment fuse box no. 2
Toyota Tarago (2013 – 2015) – fuse and relay box location – passenger compartment fuse box no. 2


Fuse Box Diagram

Toyota Tarago (2013 - 2015) - fuse box diagram - passenger compartment fuse box no. 2
Toyota Tarago (2013 – 2015) – fuse and relay box diagram – passenger compartment fuse box no. 2


Assignment of the fuses in the Fuse Box №2

Name Amp Description
1 PSB 30A No circuit
2 RR FOG 7.5A No circuit
3 P/W FR 20A Power windows
4 P/SEAT RH 30A Power seat (Front seat)
5 AM1 7.5A No circuit
6 STOP 15A Stop lights, high mounted stoplight, automatic transmission system / continuously variable transmission system, shift lock system, multiport fuel injection system / sequential multiport fuel injection system, anti-lock brake system, vehicle stability control
7 OBD 7.5A On-board diagnosis system
8 PSD RH 30A Power sliding doors
9 P/W RR 20A Power windows
10 P/POINT 15A Power outlet
11 P/POINT №2 15A Power outlet
12 RAD №2 7.5A Audio system, rear seat entertainment system
13 ECU-ACC 7.5A Smart entry & start system, pushbutton start system, outside rear view mirrors, shift lock system
14 IGN 10A Multiport fuel injection system / sequential multiport fuel injection system, SRS airbag system, multiplex communication system
15 MET 7.5A Gauges and meters
16 FR WIP 30A Windshield wipers and washer
17 SEAT HTR RH 10A Seat heater RH
18 RH ECU-IG 10A Vehicle stability control, air conditioning system, Toyota parking assist sensor, automatic transmission system / continuously variable transmission system, electric power steering, smart entry & start system, push-button start system, power sliding doors, rear sunshade, shift lock system, turn signal lights, emergency flashers, vanity lights, multiplex communication system

Instrument Panel Fuse Box №3

Fuse Box Location

Remove the lid.

Toyota Tarago (2013 - 2015) - fuse box location - passenger compartment fuse box no. 3
Toyota Tarago (2013 – 2015) – fuse and relay box location – passenger compartment fuse box no. 3


To access:

  1. Open the glove box. Slide off the damper.
  2. Pull both side of the glove box from the inside to disconnect the upper claws.
  3. Pull out the glove box and disconnect the lower claws.
Toyota Tarago (2013 - 2015) - fuse box location - passenger compartment fuse box no. 3
Toyota Tarago (2013 – 2015) – fuse and relay box location – passenger compartment fuse box no. 3

Fuse Box Diagram

Toyota Tarago (2013 - 2015) - fuse box diagram - passenger compartment fuse box no. 3
Toyota Tarago (2013 – 2015) – fuse and relay box diagram – passenger compartment fuse box no. 3


Assignment of the fuses in the Fuse Box №3

Name Amp Description
1 HTR 50A Air conditioning system
2 3RD SEAT RH 30A Power seat (Third seats)
3 3RD SEAT LH 30A Power seat (Third seats)
4 RR A/C 30A Air conditioning system

Engine Compartment

Fuse Box Location

Push the tab in and lift the lid off.

Toyota Tarago (2013 - 2015) - fuse box location - engine compartment
Toyota Tarago (2013 – 2015) – fuse and relay box location – engine compartment


Fuse Box №1  Diagrams

Toyota Tarago (2012 - 2015) - fuse box diagram - engine compartment fuse box no. 1
Toyota Tarago (2012 – 2015) – fuse and relay box diagram – engine compartment fuse box no. 1


Assignment of the fuses in the Engine Compartment Fuse Box №1

Name Amp Description
1 RH R/B ALT 100A CDS FAN, RDI FAN, PTC №1, PTC №2, PTC №3, H-LP CLAN, FOG fuse
2 RH-MAIN-JB 60A STOP, AM1, STP HI MT, STP RR, STP RL, OBD, P/W RR, PSB, P/ W FR, RR FOG, P/SEAT RH, PSD RH, CIG ECU-ACC, RAD №2, P/POINT, FR WIP, SEAT HTR RH, RH ECU-IG fuse
3 LH-MAIN-JB 80A TAIL, PANEL, P/W RL, PSD LH, S/R, 4WD, PBD, P/W FL, DR LOCK, GAUGE №1, RR WIP, SEAT HTR LH, GAUGE №2, LH ECU-IG, WASH fuse
4 SUB R/B 80A HTR. RR A/C, 3RD SEAT RH, 3RD SEAT LH fuse
5 F/B ALT 100A ABS №1, ABS №2, DEF fuse
6 ALT 140A Gauges and meters, charging system, F/B ALT, SUB R/B, RH-MAIN-JB, LH-MAIN-JB, RH R/B ALT fuse
7 F/B BATT 120A EPS, ST, A/F, EFI, TRN HAZ, IG2, FR DOOR, ETC-S, AM2 №2, AM2 N0.1, DOME, ECU-B, RAD №1 fuse
8 RH R/B BATT 60A Headlight cleaners, H-LP RL, H-LP LL, S/HORN, ECU-B3, ECU-B2, AMP, STRG LCK, HORN, H-LP RH, H-LP LH fuse
9 EPS 80A Electric power steering
10 ST 30A Multiport fuel injection system / sequential multiport fuel injection system, smart entry & start system, push-button start system
11 ABS №1 50A Anti-lock brake system, vehicle stability control
12 ABS №2 30A Anti-lock brake system, vehicle stability control
13 DEF 25A Rear window defogger, MIR HTR
14 EFI 20A Multiport fuel injection system / sequential multiport fuel injection system
15 ECU-B 10A Gauges and meters, air conditioning system, smart entry & start system, push-button start system, power sliding doors, multiplex communication system, wireless remote control system
16 DOME 7.5A Interior lights, luggage compartment light, door courtesy lights, front personal lights, rear personal lights, multiplex communication system
17 RAD №1 15A Audio system, rear seat entertainment system
18 MIR HTR 10A No circuit
19 ETC-S 10A Multiport fuel injection system / sequential multiport fuel injection system
20 AM2 №2 7.5A Multiport fuel injection system / sequential multiport fuel injection system, smart entry & start system, push-button start system
21 TRN HAZ 15A Turn signal lights, emergency flashers
22 IG2 15A Multiport fuel injection system / sequential multiport fuel injection system, smart entry & start system, push-button start system, starting system, MET, IGN fuse
23 FR DOOR 30A Smart entry & start system, pushbutton start system, multiplex communication system
24 A/F 30A Multiport fuel injection system / sequential multiport fuel injection system

Engine Compartment Fuse Box №2

Fuse Box Diagrams

Toyota Tarago (2012 - 2015) - fuse box diagram - engine compartment fuse box no. 2
Toyota Tarago (2012 – 2015) – fuse and relay box diagram – engine compartment fuse box no. 2


Assignment of the fuses in the Engine Compartment Fuse Box №2

Name Amp Description
1 WEL CAB 30A No circuit
2 CDS FAN 50A 2AZ-FE engine: Electric cooling fans
RDI FAN №2 50A 2GR-FE engine: Electric cooling fans
3 H-LP CLN 30A Headlight cleaners
4 ECU-B3 7.5A Smart entry & start system, pushbutton start system
5 ECU-B2 7.5A Power windows
6 HORN 10A Horns
7 RDI FAN 50A 2AZ-FE engine: Electric cooling fans
RDI FAN №1 50A 2GR-FE engine: Electric cooling fans
8 PTC №3 50A Air conditioning system
9 S/HORN 10A Smart entry & start system
10 STRG LCK 20A Smart entry & start system, pushbutton start system, steering lock system
11 AMP2 30A No circuit
12 PTC №2 50A Air conditioning system
13 AMP1 30A No circuit
14 H-LP LH 15A Left-hand headlight (high beam)
15 H-LP RH 15A Right-hand headlight (high beam)
16 H-LP LL 15A Left-hand headlight (low beam)
17 H-LP RL 15A Headlight leveling system, right-hand headlight (low beam)
18 PTC №1 50A Air conditioning system
19 DEICER 20A No circuit
20 FOG 15A Front fog lights

WARNING: Terminal and harness assignments for individual connectors will vary depending on vehicle equipment level, model, and market.
Toyota Tarago (2009 – 2012) – fuse and relay box diagram

Toyota Tarago (2009 – 2012) – fuse and relay box diagram

Year of production: 2009, 2010, 2011, 2011, 2012


The Toyota Tarago is a popular people mover (minivan) that has been sold in various markets, including Australia, since the early 1980s. Known for its reliability, practicality, and spaciousness, the Tarago has been widely used for family transportation, as well as by commercial services like airport shuttles or taxis. While it is no longer in production, it remains a notable model in Toyota’s lineup of MPVs (multi-purpose vehicles).

Key Features of the Toyota Tarago:

1.Seating Capacity: Typically offered with 7 or 8 seats, making it ideal for large families or group transport.

2.Interior Space: One of its biggest selling points is its roomy and flexible interior, with foldable or removable seats to accommodate both passengers and cargo.

3.Engine Options: Over the years, the Tarago has been available with various engine options, including inline-4 and V6 engines, depending on the model and generation.

4.Safety: Later models include features like airbags, ABS, and stability control to enhance safety for passengers.

5.Sliding Doors: Most models feature sliding rear doors for easier access, especially in tight parking spaces.

6.Generations: The Tarago has gone through several generations, with improvements in styling, comfort, fuel efficiency, and technology.

Evolution:

1.First Generation (1983–1990): Known as the Toyota Space Cruiser in some markets, the initial models were rear-wheel drive and had a simple, utilitarian design.

2.Second Generation (1990–2000): The design became more modern with better safety features and more powerful engine options.

3.Third Generation (2000–2006): With a more aerodynamic shape and additional comfort features, this generation solidified the Tarago’s reputation as a family-friendly vehicle.

4.Fourth Generation (2006–2019): The most recent iteration saw further refinement in terms of luxury, technology, and engine performance. It included advanced features like dual-zone climate control, navigation systems, and premium sound systems.

The Tarago has since been succeeded by models like the Toyota Granvia and Toyota HiAce, especially after the Tarago was discontinued in Australia in 2019. However, its reputation as a reliable and spacious minivan lives on, and many used models remain in demand.


Instrument Panel Fuse Box №1 (left side)

Fuse Box Location

Remove the cover; Remove the lid.

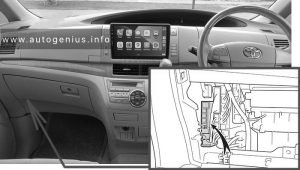
Toyota Tarago (2009 - 2012) - fuse box location - passenger compartment fuse box no. 1
Toyota Tarago (2009 – 2012) – fuse and relay box location – passenger compartment fuse box no. 1


Fuse Box Diagram

Toyota Tarago (2009 - 2012) - fuse box diagram - passenger compartment fuse box no. 1
Toyota Tarago (2009 – 2012) – fuse and relay box diagram – passenger compartment fuse box no. 1


Assignment of the fuses in the Fuse Box №1

Name Amp Description
29 WELCAB 30A No circuit
30 4WD 7.5A No circuit
31 AC INV 15A No circuit
32 DR LOCK 30A Multiplex communication system
33 P/W FL 20A Power windows
34 S/R 20A Rear sunshade
35 PSD LH 30A Power slide door
36 P/W RL 20A Power windows
37 PBD 30A No circuit
38 RR WIP 15A Windshield wipers and washer, rear window wiper and washer, headlight cleaner
39 GAUGE №1 10A Anti-lock brake system, vehicle stability control system, adaptive front lighting system, electric cooling fan, Toyota parking assist system, headlight cleaner
40 PANEL 10A Instrument panel lights, Toyota parking assist system
41 TAIL 10A Front fog lights, tail lights, position lights, license plate lights
42 LH ECU-IG 10A Adaptive front lighting system, multiplex communication system, power rear seat, power slide door
43 SEAT HTR LH 10A Seat heater LH
44 GAUGE №2 10A Charging system, automatic transmission system, backup lights, Toyota parking assist system
45 STP RR 7.5A No circuit
46 STP HI MT 7.5A No circuit
47 STP RL 7.5A No circuit

Instrument Panel Fuse Box №2 (right side)

Fuse Box Location

Remove the lid.

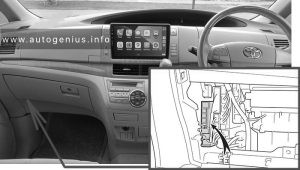
Toyota Tarago (2009 - 2012) - fuse box location - passenger compartment fuse box no. 2
Toyota Tarago (2009 – 2012) – fuse and relay box location – passenger compartment fuse box no. 2


Fuse Box Diagram

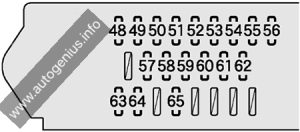
Toyota Tarago (2009 - 2012) - fuse box diagram - passenger compartment fuse box no. 2
Toyota Tarago (2009 – 2012) – fuse and relay box diagram – passenger compartment fuse box no. 2


Assignment of the fuses in the Fuse Box №2

Name Amp Description
48 PSB 30A No circuit
49 RR FOG 7.5A No circuit
50 P/W FR 20A Power windows
51 P/SEAT RH 30A Power seat
52 AM1 7.5A Starting system
53 STOP 15A Stop lights, high mounted stoplight, automatic transmission system, shift lock control system, multiport fuel injection system / sequential multi-port fuel injection system, anti-lock brake system, vehicle stability control system
54 OBD 7.5A On-board diagnosis system
55 PSD RH 30A Power slide door
56 P/W RR 20A Power windows
57 P/POINT 15A Power outlet
58 CIG 15A Cigarette lighter
59 RAD №2 7.5A Audio system, rear seat entertainment system
60 ECU-ACC 7.5A Power rear view mirrors, shift lock system
61 IGN 10A Multiport fuel injection system / sequential multiport fuel injection system, SRS airbag system, multiplex communication system
62 MET 7.5A Gauges and meters
63 FR WIP 30A Windshield wipers and washer
64 SEAT HTR RH 10A Seat heater RH
65 RH ECU-IG 10A Vehicle stability control system, air conditioning system, Toyota parking assist system, automatic transmission system, electric power steering system, power slide door, rear power sunshade, shift lock system, turn signal flashers, emergency flashers, vanity lights, multiplex communication system

Instrument Panel Fuse Box №3

Fuse Box Location

Remove the lid.

Toyota Tarago (2009 - 2012) - fuse box location - passenger compartment fuse box no. 3
Toyota Tarago (2009 – 2012) – fuse and relay box location – passenger compartment fuse box no. 3


To access:

  1. Open the glove box. Slide off the damper.
  2. Pull both side of the glove box from the inside to disconnect the upper claws.
  3. Pull out the glove box and disconnect the lower claws.
Toyota Tarago (2009 - 2012) - fuse box location - passenger compartment fuse box no. 3
Toyota Tarago (2009 – 2012) – fuse and relay box location – passenger compartment fuse box no. 3

Fuse Box Diagram

Toyota Tarago (2009 - 2012) - fuse box diagram - passenger compartment fuse box no. 3
Toyota Tarago (2009 – 2012) – fuse box diagram – passenger compartment fuse box no. 3


Assignment of the fuses in the Fuse Box №3

Name Amp Description
76 HTR 50A Air conditioning system
77 3RD SEAT RH 30A Power rear seat
78 3RD SEAT LH 30A Power rear seat
79 RR A/C 30A Air conditioning system

Engine Compartment

Fuse Box Location

Push the tab in and lift the lid off.

Toyota Tarago (2009 - 2012) - fuse box location - engine compartment
Toyota Tarago (2009 – 2012) – fuse and relay box location – engine compartment


Fuse Box №1  Diagrams

Toyota Tarago (2009 - 2012) - fuse box diagram - engine compartment fuse box no. 1
Toyota Tarago (2009 – 2012) – fuse and relay box diagram – engine compartment fuse box no. 1


Assignment of the fuses in the Engine Compartment Fuse Box №1

Name Amp Description
1 EFI 20A Multiport fuel injection system / sequential multiport fuel injection system
2 ECU-B 10A Gauges and meters, air conditioning system, power slide door, multiplex communication system, wireless remote control system
3 DOME 7.5A Interior lights, luggage room light, door courtesy lights, front personal lights, multiplex communication system
4 RAD №1 15A Audio system, rear seat entertainment system
5 MIR HTR 10A Outside rear view mirror
6 ABS №2 30A Anti-lock brake system, vehicle stability control system
7 DEF 25A Rear window defogger, “MIR HTR”
8 ST 5A No circuit
9 ETC-S 10A Multiport fuel injection system / sequential multiport fuel injection system
10 AM2 №2 7.5A Multiport fuel injection system / sequential multiport fuel injection system
11 TRN HAZ 15A Turn signal flashers, emergency flashers
12 IG2 15A Multiport fuel injection system / sequential multiport fuel injection system, starting system, “MET”, “IGN” fuse
13 AM2 №1 30A Starting system
14 FR DOOR 30A Multiplex communication system
15 A/F 30A Multiport fuel injection system / sequential multiport fuel injection system
66 EPS 80A Electric power steering system
67 ST 30A Multiport fuel injection system / sequential multiport fuel injection system
68 ABS №1 50A Anti-lock brake system, vehicle stability control system
80 RH R/B ALT 100A “CDS FAN”, “RDI FAN”, “PTC №1”, “PTC №2”, “PTC №3”, “H-LP CLAN”, “FOG” fuse
81 RH-MAIN-JB 60A “STOP”, “AM1”, “STP HI MT”, “STP RR”, “STP RL”, “OBD”, “P/W RR”, “PSB”, “P/W FR”, “RR FOG”, “P/SEAT RH”, “PSD RH”, “CIG”, “ECU-ACC”, “RAD №2”, “P/POINT”, “FR WIP”, “SEAT HTR RH”, “RH ECU-IG” fuse
82 LH-MAIN-JB 80A “TAIL”, “PANEL”, “P/W RL”, “PSD LH”, “S/R”, “4WD”, “PBD”, “P/W FL”, “DR LOCK”, “GAUGE №1”, “RR WIP”, “SEAT HTR LH”, “GAUGE №2”, “LH ECU-IG”, “WASH” fuse
83 SUB R/B 80A “HTR”, “RR A/C”, “3RD SEAT RH”, “3RD SEAT LH” fuse
84 F/B ALT 100A “ABS №1”, “ABS №2”, “DEF” fuse
85 ALT 140A Gauges and meters, charging system, “F/B ALT”, “SUB R/B”, “RH-MAIN-JB”, “LH-MAIN-JB”, “RH R/B ALT” fuse
86 F/B BATT 120A “EPS”, “ST”, “A/F”, “EFI”, “TRN HAZ”, “IG2”, “FR DOOR”, “ETC-S”, “AM2 №2”, “AM2 №1”, “DOME”, “ECU-B”, “RAD №1” fuse
87 RH R/B BATT 60A Headlight cleaner, “H-LP RL”, “H-LP LL”, “S/HORN”. “ECU-B3”, “ECU-B2”, “AMP”, “STRG LCK”, “HORN”, “H-LP RH”, “H-LP LH” fuse

Engine Compartment Fuse Box №2

Fuse Box Diagrams

Toyota Tarago (2009 - 2012) - fuse box diagram - engine compartment fuse box no. 2
Toyota Tarago (2009 – 2012) – fuse and relay box diagram – engine compartment fuse box no. 2


Assignment of the fuses in the Engine Compartment Fuse Box №2

Name Amp Description
16 H-LP LH 15A Left-hand headlight (high beam)
17 H-LP RH 15A Right-hand headlight (high beam)
18 H-LP LL 15A Left-hand headlight (low beam)
19 H-LP RL 15A Headlight beam level control system, right-hand headlight (low beam)
20 ECU-B3 7.5A No circuit
21 ECU-B2 7.5A Power windows
22 S/HORN 10A No circuit
23 DEICER 20A No circuit
24 FOG 20A Front fog lights
25 HORN 10A Horns
26 STRG LCK 20A No circuit
27 AMP2 30A No circuit
28 AMP1 30A No circuit
69 CDS FAN / RDI FAN №2 50A Electric cooling fan
70 RDI FAN / RDI FAN №1 50A Electric cooling fan
71 WEL CAB 30A No circuit
72 H-LP CLN 30A Headlight cleaner
73 PTC №3 50A Air conditioning system
74 PTC №2 50A Air conditioning system
75 PTC №1 50A Air conditioning system

WARNING: Terminal and harness assignments for individual connectors will vary depending on vehicle equipment level, model, and market.
Mitsubishi Galant (2004 – 2012) – fuse box diagram

Mitsubishi Galant (2004 – 2012) – fuse box diagram

Year of production: 2004, 2005, 2006, 2007, 2008, 2009, 2010, 2011, 2012

Passenger Compartment Fuse Box

Fuse Box Location

The fuse box is located on the driver’s the side of the instrument panel,  behind the cover.

Mitsubishi Galant (2004 - 2012)- fuse box location - passenger compartment
Mitsubishi Galant (2004 – 2012)- fuse box location – passenger compartment

Fuse Box Diagram

Mitsubishi Galant (2004 - 2012)- fuse box location - passenger compartment
Mitsubishi Galant (2004 – 2012)- fuse box location – passenger compartment
Amps Function
1
2
3 30A Radio
4 20A Sunroof
5 30A Rear window defogger
6 30A Heater
7
8
9 15A Power outlet
10 15A Power door locks
11
12
13 7,5A Engine control
14 7,5 Outside rearview mirrors
15
16 15A Cigarette lighter
17 7,5A Engine control
18
19 7,5A Door mirror heater
20 7,5 Relay
21
22 7,5A Back-up light
23 7,5A Gauge
24 10A Ignition coil
25 20A Spare fuse
26 30A Spare fuse
27 30A Spare fuse

Engine Compartment Fuse Box

Fuse Box Location

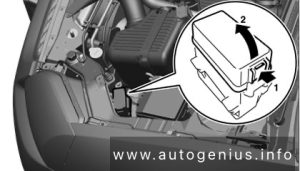
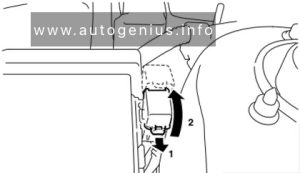
The fuse boxes are located in the engine compartment (left-side).

Mitsubishi Galant (2004 - 2012)- fuse box location - engine compartment
Mitsubishi Galant (2004 – 2012)- fuse box location – engine compartment
Type A
Mitsubishi Galant (2004 - 2012)- fuse box location - engine compartment (type A)
Mitsubishi Galant (2004 – 2012)- fuse box location – engine compartment (type A)
Type B
Mitsubishi Galant (2004 - 2012)- fuse box location - engine compartment (type B)
Mitsubishi Galant (2004 – 2012)- fuse box location – engine compartment (type B)
Type C
Mitsubishi Galant (2004 - 2012)- fuse box location - engine compartment (type C)
Mitsubishi Galant (2004 – 2012)- fuse box location – engine compartment (type C)

Fuse Box Diagram

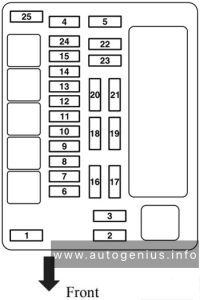
Type A
Mitsubishi Galant (2004 - 2012)- fuse box diagram - engine compartment (type A)
Mitsubishi Galant (2004 – 2012)- fuse box diagram – engine compartment (type A)
Assignment of the fuses in the Engine compartment
Amps Function
1 80A* Battery
2 30A* Radiator fan motor
3 60A* Anti-lock braking system
4 40A* Ignition switch
5 30A* Power window control
6 15A Front fog lights/Daytime running lights
7 20A Heated seat
8 15A Horn
9 20A Engine control
10 10A Air conditioning
11 15A Stop lights
12 10A Rear fog light
13 7,5A Alternator
14 10A Hazard warning flasher
15 20A Automatic transaxle
16 10A Headlight high beam (right)
17 10A Headlight high beam (left)
18 10A Headlight low beam (right)
19 10A Headlight low beam (left)
20 7,5A Taił light (right)
21 7,5 Taił light (left)
22 10A Dome light
23 10A Radio
24 15A Fuel pump
25 30A Windshield wiper
*: Fusible link
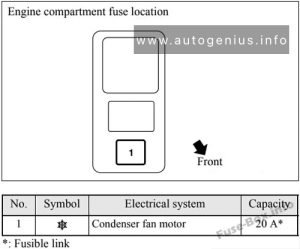
Type B
Mitsubishi Galant (2004 - 2012)- fuse box diagram - engine compartment (type B)
Mitsubishi Galant (2004 – 2012)- fuse box diagram – engine compartment (type B)
Amps Function
1 20A* Condenser fan motor
*: Fusible link
Type C
Mitsubishi Galant (2004 - 2012)- fuse box diagram - engine compartment (type C)
Mitsubishi Galant (2004 – 2012)- fuse box diagram – engine compartment (type C)
Amps Function
1 40A* Radio
*: Fusible link

Cigar lighter (power outlet) fuses in the Mitsubishi Galant are the fuses #9 (Power outlet), and #16 (Cigarette lighter) in the Passenger compartment fuse box.

WARNING: Terminal and harness assignments for individual connectors will vary depending on vehicle equipment level, model, and market.
Dodge Ram 5500 Chassis Cab (2012) – fuse box diagram

Dodge Ram 5500 Chassis Cab (2012) – fuse box diagram

Year of production: 2012

Engine  Compartment

Fuse Box Location

The Totally Integrated Power Module is located in the engine compartment near the battery. This center contains cartridge fuses and mini fuses. A description of each fuse and component may be stamped on the inside cover, otherwise the cavity number of each fuse is stamped on the inside cover.

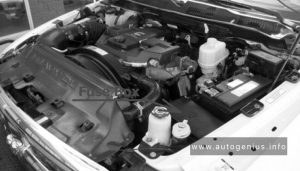
Dodge Ram 5500 Chassis Cab - fuse box location - engine compartment
Dodge Ram 5500 Chassis Cab – fuse box location – engine compartment

Fuse box diagram

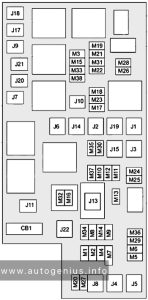
Dodge Ram 5500 Chassis Cab - fuse box diagram - engine compartment
Dodge Ram 5500 Chassis Cab – fuse box diagram – engine compartment
Cartridge Fuse Mini Fuse Description
J01 40A Green Trailer Tow
J02 30A Pink Electric Brake
J03 30A Pink Diesel Powertrain Control Module – If Equipped
J04 25A Natural Driver Door Node
J05 25A Natural Passenger Door Node
J06 40A Green Antilock Brakes Pump / Stability Control System
J07 30A Pink Antilock Brakes Valve / Stability Control System
J08 40A Green Power Seat
J10 30A Pink Sway Bar Module – If Equipped
J11 30A Pink Transfer Case Module
J12 30A Pink Rear Defroster
J13 60A Yellow Main Ignition Off Draw (IOD) Fuse
J14 20A Blue Trailer Tow Lamps / Park Lamps
J15 40A Green Front Blower
J17 40A Green Starter Motor Solenoid
J18 20A Blue Powertrain Control Module Transmission Range
J19 60A Yellow Rad Fan Motor HI / Rad Fan Motor Low
J20 30A Pink Front Wiper Ground / Low/High
J21 20A Blue Washer Control
J22 25A Natural Sunroof Module
M1 15A Blue Stop Switch Lamp
M5 25A Natural 115V AC Inverter
M6 20A Yellow Power Outlet (Instrument Panel or Front Console) / Rain Snsr
M7 20A Yellow Power Outlet (Rear Console or Center Seat)
M8 20A Yellow Front Heated Seat & Steering Wheel
M9 20A Yellow Rear Heated Seats
M10 15A Blue Hands Free Module / Vanity Lamp / Universal Garage Door Opener Module
M11 10A Red Climate Control System
M12 30A Green Radio / Amplifier
M13 20A Yellow Main #2 Instrument Cluster / Wireless Control Module / ITM / Siren / Multifunction Switch (Steering Column Module)
M14 20A Yellow Back Up Camera (Domestic Only)
M15 20A Yellow Power Seat Module(s) /Audio Telematics / Daytime Running Lights Relay / Instrument Cluster/Transfer Case Module
M16 10A Red Airbag Module
M18 15A Blue Center Stop Lamp
M19 25A Natural Automatic Shutdown 1 and 2
M20 15A Blue Instrument Cluster Interior Lighting / Sw Steering Wheel / Sw Bank
M21 20A Yellow Automatic Shutdown 3
M22 10A Red Horns (Low/High) – Right
M23 10A Red Horns (Low/High) – Left
M25 20A Yellow Fuel Pump Motor / Diesel Lift Pump – If Equipped
M26 10A Red Driver’s Door Switch
M27 10A Red Ignition Switch
M28 15A Blue Powertrain Control Module
M29 10A Red Tire Pressure Monitor
M30 15A Blue J1962 Diag Connector
M31 20A Yellow Back-Up Lamps
M32 10A Red Airbag Module
M33 10A Red Powertrain Control Module
M34 10A Red Park Assist Module / Climate Control System Module / IR Sensor / Compass Module
M35 15A Blue Left Front & Rear Parklamps
M36 20A Yellow Power Outlet (Instrument Panel or Center Console)
M37 10A Red Antilock Brakes / Stability Control System Module / Stoplamp Switch
M38 25A Natural All Door Lock&Unlock

WARNING: Terminal and harness assignments for individual connectors will vary depending on vehicle equipment level, model, and market.
Dodge Ram 4500 Chassis Cab (2012) – fuse box diagram

Dodge Ram 4500 Chassis Cab (2012) – fuse box diagram

Year of production: 2012

Engine  Compartment

Fuse Box Location

The Totally Integrated Power Module is located in the engine compartment near the battery. This center contains cartridge fuses and mini fuses. A description of each fuse and component may be stamped on the inside cover, otherwise the cavity number of each fuse is stamped on the inside cover.

Dodge Ram 4500 Chassis Cab - fuse box location - engine compartment
Dodge Ram 4500 Chassis Cab – fuse box location – engine compartment

Fuse box diagram

Dodge Ram 4500 Chassis Cab - fuse box diagram - engine compartment
Dodge Ram 4500 Chassis Cab – fuse box diagram – engine compartment
Cartridge Fuse Mini Fuse Description
J01 40A Green Trailer Tow
J02 30A Pink Electric Brake
J03 30A Pink Diesel Powertrain Control Module – If Equipped
J04 25A Natural Driver Door Node
J05 25A Natural Passenger Door Node
J06 40A Green Antilock Brakes Pump / Stability Control System
J07 30A Pink Antilock Brakes Valve / Stability Control System
J08 40A Green Power Seat
J10 30A Pink Sway Bar Module – If Equipped
J11 30A Pink Transfer Case Module
J12 30A Pink Rear Defroster
J13 60A Yellow Main Ignition Off Draw (IOD) Fuse
J14 20A Blue Trailer Tow Lamps / Park Lamps
J15 40A Green Front Blower
J17 40A Green Starter Motor Solenoid
J18 20A Blue Powertrain Control Module Transmission Range
J19 60A Yellow Rad Fan Motor HI / Rad Fan Motor Low
J20 30A Pink Front Wiper Ground / Low/High
J21 20A Blue Washer Control
J22 25A Natural Sunroof Module
M1 15A Blue Stop Switch Lamp
M5 25A Natural 115V AC Inverter
M6 20A Yellow Power Outlet (Instrument Panel or Front Console) / Rain Snsr
M7 20A Yellow Power Outlet (Rear Console or Center Seat)
M8 20A Yellow Front Heated Seat & Steering Wheel
M9 20A Yellow Rear Heated Seats
M10 15A Blue Hands Free Module / Vanity Lamp / Universal Garage Door Opener Module
M11 10A Red Climate Control System
M12 30A Green Radio / Amplifier
M13 20A Yellow Main #2 Instrument Cluster / Wireless Control Module / ITM / Siren / Multifunction Switch (Steering Column Module)
M14 20A Yellow Back Up Camera (Domestic Only)
M15 20A Yellow Power Seat Module(s) /Audio Telematics / Daytime Running Lights Relay / Instrument Cluster/Transfer Case Module
M16 10A Red Airbag Module
M18 15A Blue Center Stop Lamp
M19 25A Natural Automatic Shutdown 1 and 2
M20 15A Blue Instrument Cluster Interior Lighting / Sw Steering Wheel / Sw Bank
M21 20A Yellow Automatic Shutdown 3
M22 10A Red Horns (Low/High) – Right
M23 10A Red Horns (Low/High) – Left
M25 20A Yellow Fuel Pump Motor / Diesel Lift Pump – If Equipped
M26 10A Red Driver’s Door Switch
M27 10A Red Ignition Switch
M28 15A Blue Powertrain Control Module
M29 10A Red Tire Pressure Monitor
M30 15A Blue J1962 Diag Connector
M31 20A Yellow Back-Up Lamps
M32 10A Red Airbag Module
M33 10A Red Powertrain Control Module
M34 10A Red Park Assist Module / Climate Control System Module / IR Sensor / Compass Module
M35 15A Blue Left Front & Rear Parklamps
M36 20A Yellow Power Outlet (Instrument Panel or Center Console)
M37 10A Red Antilock Brakes / Stability Control System Module / Stoplamp Switch
M38 25A Natural All Door Lock&Unlock

WARNING: Terminal and harness assignments for individual connectors will vary depending on vehicle equipment level, model, and market.

Dodge Ram Cargo Van (2012 – 2015) – fuse box diagram

Dodge Ram Cargo Van (2012 – 2015) – fuse box diagram

Year of production: 2012, 2013, 2014, 2015

Engine Compartment – Totally Integrated Power Module

Fuse Box Location

The Totally Integrated Power Module is located in the engine compartment near the battery. This center contains cartridge fuses and mini-fuses. A label that identifies each component may be printed or embossed on the inside of the cover.
Dodge Ram Cargo Van - fuse box location - engine compartment
Dodge Ram Cargo Van – fuse box location – engine compartment
Power windows:
  • 2012: The power windows are fused by a 25 Amp circuit breaker located under the instrument panel near the steering column.
  • 2013-2015: The power windows are fused by a 25 Amp circuit breaker located in the Totally Integrated Power Module.

Fuse box diagram

Dodge Ram Cargo Van - fuse box diagram - engine compartment
Dodge Ram Cargo Van – fuse box diagram – engine compartment
Cartridge Fuse Mini-Fuse Description
J1 40A Green Power Folding Seat
J2 30A Pink Power Liftgate Module
J3 30A Pink Rear Door Module
J4 25A Clear Driver Door Node
J5 25A Clear Passenger Door Node
J6 40A Green Antilock Brakes Pump / Stability Control System
J7 30A Pink Antilock Brakes Valve / Stability Control System
J8 40A Green Power Memory Seat – If Equipped
J9 40A Green Partial Zero Emissions Vehicle Motor / Flex Fuel – If Equipped
J10 30A Pink Headlamp Wash / Manifold Tuning Valve – If Equipped
J11 30A Pink Power Sliding Door Module / Anti-Theft Module – If Equipped
J12 30A Pink HVAC Rear Blower, Radiator Fan Motor
J13 60A Yellow Ignition Off Draw (IOD) – Main
J14 40A Green Rear Window Defogger
J15 40A Green Front Blower
J17 40A Green Starter Solenoid
J18 20A Blue Powertrain Control Module Trans Range
J19 60A Yellow Radiator Fan
J20 30A Pink Front Wiper LO/HI
J21 20A Blue Front/Rear Washer
J22 25A Clear Sunroof Module
M1 15A Blue Rear Center Brake Lamp / Brake Switch
M2 20A Yellow 2012: Trailer Lighting, Front Fog Lamps, Intelligent Battery Sensor (IBS)
2013-2015: Front Fog Lamps
M3 20A Yellow Front/Rear Axle Locker, Vacuum Pump Motor
M4 10A Red Trailer Tow
M5 25A Clear Inverter
M6 20A Yellow Power Outlet #1 (ACC), Rain Sensor, Cigar Lighter (Instrument Panel or with Console Rear)
M7 20A Yellow Power Outlet #2 (BATT/ACC SELECT) – Center Seat or with Console Rear
M8 20A Yellow Front Heated Seat – If Equipped
M9 20A Yellow Rear Heated Seat – If Equipped
M10 15A Blue Ignition Off Draw – Video System, Satellite Radio, DVD, Hands-Free Module, Universal Garage Door Opener, Vanity Lamp, Streaming Video Module – If Equipped
M11 10A Red Climate Control System
M12 30A Green Amplifier / Radio
M13 20A Yellow Instrument Cluster, SIREN, Clock Module, Multi-Function Control Switch – If Equipped
M14 20A Yellow Trailer Tow – If Equipped
M15 20A Yellow Rear View Mirror, Instrument Cluster, Multi-Function Control Switch, Tire Pressure Monitor, Glow Plug Module – If Equipped
M16 10A Red Airbag Module / Occupant Classification Module
M17 15A Blue Left Tail/License/Park Lamp, Running Lamps
M18 15A Blue Right Tail/Park/Run Lamp
M19 25A Clear Powertrain
M20 15A Blue Instrument Cluster Interior Light, Switch Bank, Steering Column Module, Switch Steering Wheel
M21 20A Yellow Powertrain
M22 10A Red Horn
M23 10A Red Horn
M24 25A Clear Rear Wiper
M25 20A Yellow Fuel Pump, Diesel Lift Pump – If Equipped
M26 10A Red Power Mirror Switch, Driver Window Switch
M27 10A Red Wireless Control Module, Keyless Entry Module
M28 10A Red Powertrain, Transmission Control Module
M29 10A Red Occupant Classification Module
M30 15A Blue Rear Wiper Module, Power Folding Mirror
M31 20A Yellow Back-Up Lamps
M32 10A Red Airbag Module, THATCHUM – If Equipped
M33 10A Red Powertrain
M34 10A Red Park Assist, Heater Climate Control Module, Headlamp Wash, Compass, Rear Camera, Door Lamps, Flashlight, Relay Diesel Cabin Heater, Rad Fan Diesel – If Equipped
M35 10A Red Heated Mirrors
M36 20A Yellow Power Outlet #3 (Instrument Panel or with Console Center)
M37 10A Red Antilock Brakes, Stability Control, Stop Lamp, Fuel Pump
M38 25A Clear Door Lock/Unlock Motors, Liftgate Lock/Unlock Motors
CB1 25A circuit breaker 2013-2015: Power Windows

WARNING: Terminal and harness assignments for individual connectors will vary depending on vehicle equipment level, model, and market.